Showing posts with label free pattern. Show all posts

Monday, 7 April 2014

Fingerless gloves *free pattern*


You will need 

One ball of Sirdar Crofter DK, or 110m (120m, 145m) of DK yarn 
3.5mm needles 
4.5mm needles 
2 stitch markers 
Needle for seaming 

Sizes S, M, L 


Using 3.5mm needles CO 36 (40, 44) sts using cable CO. 
Rows 1-8: k2, p2 rib 
Row 9: change to 4.5mm needles, k33 (37, 41) kf&b, k2 [37, 41, 45 sts] 
Row 10: p Row 11-14: knit one row; purl one row; knit one row; purl one row 
Row 15: k17 (19, 21), m1r, k3, m1l, k to end [39, 43, 47 sts] 
Row 16: p 
Row 17: k17 (19, 21), m1r, k5, m1l, k to end [41, 45, 48 sts] 
Row 18: p (for large size gloves, knit an extra row, purl an extra row, continue as for small and medium) 
Row 19: k19 (21, 23) pm, m1r, k3, m1l, pm, k to end [43, 47, 51 sts] 
Row 20: p 
Row 21: k19 (21, 23) slm, m1r, k to marker, m1l, slm, k to end 
Row 22: p 
Repeat rows 21 and 22 until there are 15 sts between each marker, ending with a purl row [53, 57, 61 sts]. 
Row 31: k (remembering to slip markers) 
Row 32: p 
Row 33: k to marker, slm, p2, k2, p2, k2, p2, k2, p3, slm, k to end 
Row 34: p to marker, slm, k3, p2, k2, p2, k2, p2, k2, slm, p to end 
Repeat rows 33 and 34 twice (repeat three times for large size if needed). 
Row 39: k to marker, remove marker, BO in pattern to marker, remove marker, k to end 
Row 40: p18 (20, 22), p2tog, p to end [37, 41, 45 sts] 

Stockinette stitch for 8 (8, 10) rows, ending with a purl row (making sure you p2tog on last row to get back to an even number of sts). 

Change back to 3.5mm needles, k2, p2 rib for 7 rows, BO in pattern. 


Sew the side seam. Wear!

Tuesday, 29 October 2013

Maddison Cowl

A friend asked me to make a cowl for her little girl Maddison, so I thought I'd write up how I did it. 

You will need: 
Less than 50 metres each of three different colours of double knitting 
3.5mm hook 

You will need to make 8 granny squares using your favourite method. I really like the Purl Bee tutorial, it is explained really well and is super easy to follow!

So you'll be making 8 squares and sewing them together into a band. You could make all the squares the same, but I like them all to be different. Have a look at the picture to see how I made them. The sizing can be adjusted at this point - my squares were a little under 3 inches - so if you want to make it smaller, make fewer squares - if you want it larger, make more!


Once the granny squares have been sewn into a band, you'll be continuing the granny pattern (*3 tr, ch1, rep from * - or in American terms it's *3dc, ch1, rep from *) remembering to make 3 trebles (or doubles if you're American) inbetween each square. Look at the next picture to see how I did it. Easy right? I did 5 rows of granny, but you could make fewer, or more if you wanted. The last row is slightly different - just do the 3 trebles (or doubles) in each ch1 space, but don't ch1 - this makes the top and bottom of the cowl ever so slightly smaller, which helps to keep it snug on your neck. 

Isn't it pretty? The next time I make one I'm going to use all my favourite granny square patterns. Hope Maddison likes her cowl, and that it keeps her warm this Winter.
 

Sunday, 11 November 2012

Beaumont cowl

I designed this cowl while staying in a lovely little village in France, called Beaumont. 

You will need: 
22-24” 4.5mm circular needle 
22-25” 5mm circular needle 
170 metres DK yarn 
one stitch marker 
cable needle 
tapestry needle 

This makes a cowl with a 24” circumference, to make it larger or smaller simply increase or decrease by 12 sts, but this size should fit everyone. 

Using 4.5mm needle CO 156 sts using cable CO, join for working in the round and remember to place the stitch marker! 
K2, p2 rib for four rounds. Change to 5mm needles. 
Rows 1, 2, 3, and 4: *K6, p1, k4, p1, repeat from * to end of round. 
Row 5: *C4f, k2, p1, c4f, p1, repeat to end of round. 
Rows 6, 7, 8, and 9: Same as round 1. 
Row 10: *K2, c4f, p1, c4f, p1, repeat to end of round. 

Repeat these 10 rows four times, then repeat row 1 four times. 
Change back to 4.5mm needles and k2, p2 rib for five rounds. 
BO using a 5mm needle – this will help the rib to fan out and fit on your shoulders better. 
Weave in ends and you're done! 


Thursday, 11 November 2010

Plume slouch hat *free pattern*

Fits a head that is approximately 22.5 inches around (but is very stretchy, and fits smaller heads just fine) and is knitted flat and seamed afterwards. For a slouchier fit, change to a bigger needle size on the first row after the rib.

Tension: 4 inches = 11 sts in k1, p1 rib.

You will need:
5 mm needles
Chunky yarn (about 112 metres of Sirdar Click Chunky)


Pattern:

CO 62 sts.
K1, p1 rib for about an inch.

The next 2 rows are the set up rows. I’ve had some messages about how to do the first set up row, so I decided to write it all out to make it a bit easier to understand.

First set up row:
(RS) P1, k1, p2, k2, kf&b, k4, kf&b, k3, p2, k1, p2, k2, kf&b, k2, kf&b, k1, kf&b, k2, p2, kf&b, p1, k2, kf&b, k2, Kf&b, k1, kf&b, k2, p2, k1, p2, k2, kf&b, k4, kf&b, k3, p2. You should now have 73 sts.

Second set up row:
(WS) K2, *p13, [k5] repeat from * omitting between the [ ] on the 3rd repeat, to last 4 sts, k4.

This means you K2, then p13, k5 three times, then p13 once. You should now have 4 sts left, k4.

Pattern starts here:

P1, k1b, p2, *k4tog, (YO, k1) 5times, YO, k4tog, [p2, k1b, p2[ repeat from * omitting between the [ ] on the 3rd repeat, to last 2 sts, p2.
K2 *p13, [k5] repeat from * omitting between the [ ] on the 3rd repeat, to last 4 sts, k4.
P1, k1b, p2, *k13, [p2, k1b, p2] repeat from * omitting between the [ ] on the 3rd repeat, to last 2 sts, to last 2 sts, p2.
K2 *p13, k5 repeat from * to last 4 sts, k4.
Repeat these 4 rows until piece measures about 6 or 7 inches in length (the longer it is, the slouchier it is).

Begin crown shaping (only 17 rows left):

1. P1, k1b, p2tog, *k4tog, (YO, k1) 5times, YO, k4tog, [p2tog, k1b, p2tog] repeat from * omitting between the [ ] on the 3rd repeat, to last 2 sts, p2. 66 sts on the needle.
2. K2 *p13, [k3] repeat from * omitting between the [ ] on the 3rd repeat, to last 3 sts, k3. 66 sts.
3. P1, k1b, p1, *k2tog, k9, k2tog, [p1, k1b, p1] repeat from * omitting between the [ ] on the 3rd repeat, to last 2 sts, p2. 58 sts.
4. K2 *p11, [k3] repeat from * omitting between the [ ] on the 3rd repeat, to last 3 sts, k3. 58 sts.
5. P1, k1b, p1, *k3tog, YO, k2, YO, k1, YO, k2, YO, k3tog, [p1, k1b, p1] repeat from * omitting between the [ ] on the 3rd repeat, to last 2 sts, p2. 58 sts.
6. K2 *p11, [k3] repeat from * omitting between the [ ] on the 3rd repeat, to last 3 sts, k3. 58 sts.
7. P1, k1b, p1, *k11, [p1, k1b, p1] repeat from * omitting between the [ ] on the 3rd repeat, to last 2 sts, p2. 58 sts.
8. K2 *p11, [k3] repeat from * omitting between the [ ] on the 3rd repeat, to last 3 sts, k3. 58 sts.
9. P1, p2tog, *k3tog, k2tog, YO, k1, YO, k2tog, k3tog, [p3tog] repeat from * omitting between the [ ] on the 3rd repeat, to last 2 sts, p2. 35 sts.
10. K2 *p7, [k1] repeat from * omitting between the [ ] on the 3rd repeat, to last 2 sts, k2. 35 sts.
11. P2 *k7, [p1] repeat from * omitting between the [ ] on the 3rd repeat, to last 2 sts, p2. 35 sts
12. K2 *p7, [k1] repeat from * omitting between the [ ] on the 3rd repeat, to last 2 sts, k2. 35 sts.
13. P2 *k3tog, YO, k1, YO, k3tog [p1] repeat from * omitting between the [ ] on the 3rd repeat, to last 2 sts, p2. 27 sts
14. K2 *p5, [k1] repeat from * omitting between the [ ] on the 3rd repeat, to last 2 sts, k2. 27 sts.
15. P2 *k2tog, k1, k2tog, [p1] repeat from * omitting between the [ ] on the 3rd repeat, to last 2 sts, p2. 19 sts.
16. K2 *p3tog, [k1] repeat from * omitting between the [ ] on the 3rd repeat, to last 2 sts, k2. 11 sts
17. K1 *k2tog, repeat from * 5 times. 6 sts.

Cut a long tail, and using a sewing needle thread the yarn through the 6 sts and pull tight.
Seam and weave in ends.

Saturday, 4 September 2010

Tro wristbands *free pattern*


Free pattern for a modern, masculine looking wristband knitted with Turkish Rib. Although I'm sure if you used pretty wool it could look feminine too!

You will need:
4mm straight needles
Less than half a ball of DK yarn (would be nice to use some luxury yarn for this, sadly I don’t have any luxury yarn so I used Sirdar Escape DK)

Tension/gauge:
About 10 sts to 2 inches.
Pattern makes a wristband about 7 inches in diameter (if you need a bigger or smaller size, just CO more or less sts – but make sure it’s a multiple of 2.) I recommend knitting 4 rows of K2, p2 rib and slipping it off the needle. If it fits your writs you’re good to go, if not, CO again with more sts.

CO 32 (use cable CO if you like, I made one with and one without and with a project this small I don't think it really matters).
K2, p2 rib for 3 rows.
K row.
P1, *p2tog, yrn; rep from * to last st, p1
K1, *yf, k2tog; rep from * to last st, k1
Rep last two rows 6 times (or until desired length).
P row.
K12, p2 rib for 3 rows.
BO loosely (I use needles a size or two up as my BO is quite tight).

Sew together into a tube and weave in ends (NB when it’s finished it’s not rectangular, it’s more of a parallelogram; just make sure you seam it the right way!)
Wear with style, or give away as a last-minute gift.

*Tro means ‘turn’ in Welsh, the Turkish Rib turns around your wrist as your wear it. It is pronounced to rhyme with ‘floor’.

Wednesday, 19 May 2010

Ostrich Plume Shrug


I love Ostrich Plume lace! I've designed a shrug, based on all the other 'knit a rectangle and seam into a circle' shrugs that are around. Not very original, but it's cute!
I made it for Mam Graig Fawr, my mamgu. She's not very well at the moment. I spoke to her on the phone and she sounded so fed up, I wanted to make something to cheer her up.

PDF can be downloaded here.

Edit 29/05/10: There were 2 errors in the pattern. I'll try to explain.
The ribbing is CO with 5mm needles, then each st (except the first 2 and last 2 sts) is kf&b and pf&b. Then you switch to 7mm needles and do the body (lace) section, then (except the first 2 and last 2 sts) you k2tog and ptog. Then you switch back to 5mm needles to do the last ribbing part.
If you have any questions, please message me. Thank you!

Monday, 2 November 2009

Little Bee Cowl

New pattern! Little Bee stitch is my new fave stitch, it's so cute. I want to knit a swatch in yellow and black like a bee. I'm trying pdfs for my patterns from now on. Hope this works.


There, just click the arrow to download the pdf.

If that doesn't work, try clicking here to download the pdf directly.

Friday, 11 September 2009

Ostrich Plume Cowl

You will need:
3 balls Sirdar Denim Ultra (or other mega chunky yarn)

10 mm knitting needles (US size 15)
7 mm knitting needles
This makes a medium to large size cowl, but it is easy to make smaller. It's basically 3 repeats of the ostrich plume stitch, with reverse stocking stitch in between - so if you want to make the cowl smaller (or larger), simply decrease (or increase) the amount of reverse stocking stitch between the pattern repeats. (This pattern states 3 sts between repeats, but the cowl in the picture has 4 sts).Gauge is not massively important, but about 3 sts per inch.

Ostrich plume pattern is easy to remember:
1st row: K.
2nd row: P.

3rd row: K4tog, (YF K1) 5 times, YF, K4tog.
4th row: P.


Cowl pattern:
With 7mm needles CO 51 sts, K2 P2 rib for 3 rows, then switch to 10mm needles.
K to end of row.
P to end of row.
K3, *K4tog, (YF K1) 5 times, YF, K4tog; repeat from * to last 3 sts, K3.
P to end of row.
Repeat last 4 rows until cowl reaches desired length, then switch to 7mm needles and K2 P2 for 3 rows.
BO in pattern (using a 10 mm needle to keep the BO sts loose).
Weave in ends, sew together.

There, easy!

Tuesday, 26 May 2009

Beautiful knitted nests

Just saw these lovely nests on Ravelry:


Free pattern available here, from After I finish this row...

Tuesday, 28 April 2009

CD-base Handbag

You will need:
Five 6mm dpns
Two 6mm straight needles (optional)
Two balls of King Cole Waves (MC)
Two balls Sirdar Curly Wurly (CC)
One button with a shaft (easier to sew than a button with holes)
Stitch marker
3mm crotchet hook
Tapestry needle
Sewing needle
Small amount of sewing thread in MC
One CD (music on it is entirely up to you!)

Gauge is pretty important with this bag = 3 sts per inch

The bag is made by knitting a tube, then decreasing sts to make a flat, circular bottom. A CD is then knitted into the base for support; then handles and a flap are added.

Bag:
With both yarns held together CO 38 sts, join to knit in the round (1st needle 10 sts, 2nd needle 9 sts, 3rd needle 10 sts, 4th needle 9sts) being careful not to twist (place marker at start of round), then work k1, p1 for 3 rounds.
K until tube is about 6 inches long.

P 1 round, then drop the Curly Wurly (CC) and cut it leaving a tail long enough to weave in later.
K 1 round.Make two decreases per needle for this round by k3, k2tog, k2 k2tog, k to end of round.
K 1 round...
Continue in this way until there are 4 sts left on each needle; then k1, k2tog k1; next round k1, k2tog; cut a long tail and pull through all sts and pull tight; sew to secure; weave in all ends.

Using the crotchet hook, pull all the curly bits through to the outside of the bag.

Using MC, CO 40 sts (10 on each needle), join to knit in the round being careful not to twist, then k 2 rounds.
Decrease as above, until you have 4 sts left on each needle; then k1, k2tog k1; next round k1, k2tog; cut a long tail and pull through all sts and pull tight; sew to secure; weave in ends. You will now have a floppy sort of circle.
Turn bag inside out and sew half of the floppy circle to the inside of the bottom.

Insert the CD, then continue sewing until CD is totally encased.
The turn back the right way out.

Handle:

Using both yarns held together, CO 7 sts and knit (stocking stitch) for about 12 inches.
Sew ends inside opposite sides of the opening. As stocking stitch naturally curls, there is no need to sew this tube shut (but you could if you wanted to).

Flap:
In the centre of the back of the bag opening, pick up 8 sts.
K1, p1 to end of row.
P1, k1 to end of row; keep doing this for about 3 inches, ending on a p1, k1 row.
K1, p1, k1, BO 2 sts, p1, k1, p1.
P1, k1, p1, CO 2 sts, k1, p1.
Work another two rows, keeping in pattern and BO.
Using sewing needle and thread, sew button in correct place according to buttonhole.

Presto, a pretty little bag that knits up fast and is superglam.
I added pearls to the front of mine to zhoosh it up a little. You could decorate it, or not, as you like.

I made this as a present for someone, and I burned songs the recipient would like, even though she can never listen to the CD. I felt so guilty that I then burned another CD with the songs on that she could enjoy!

Wednesday, 20 February 2008

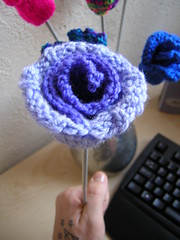
Flowers for Mam


Blodau


I made some of these for my Mam’s 56th birthday, she loved them, and has started making some as gifts for her knitting friends. They are also super easy to make!
Use any wool that you like, and pretty much any size needles. I used DK with 3.5mm double pointed needles.

You will need:

Set of 4 dpns (whatever size you’re used to)
Yarn (whatever type goes with your chosen needles)
Tapestry needle
Scissors
A spare hour or two

Okay here we go:
CO 30 sts. I always cast all my sts onto 1 ordinary needle, then transfer them to the double points as needed. I also CO 1 extra st, then knit the extra st and the first st together.
Divide the sts as 10 on each needle, join, then K 1 round.
K2, P1, K4, P1, K2 – for three rounds.
K until piece is about 1 ½ inches long.
Begin decreases:
K2, K2tog, K2, K2tog, K2.
K 1 round.
K1, K2tog, K2, K2tog, K1.
K1 round.
K2, K2tog, K2.
K2, K2tog, K1.
K1, K2tog, K1.
K1, K2tog.
You’ll now have 2 sts on each needle, cut the yarn leaving a long tail and thread through remaining sts, remove the needles and pull to draw tight. Weave in the yarn.

Now turn it inside out.
Pick up sts along a line, 1 sts every other purl bump.
Slip the first sts of every row, and then stocking sts until piece measure approx 5 inches / 13cm.
Garter stitch (knit every row) for another 2 inches / 6cm.
Cast off (bind off) leaving a long tail.
Now roll the long strip up like a swiss roll, and using the tail of yarn, sew closed at the end which is the bottom of the cup.
Now you turn the cup inside out, push a knitting needle through the middle of the flower and out of the end of the cup, pull down all the way and…


Presto! You have a flower. Make loads and put them in a vase.


Blodau
Related Posts with Thumbnails